Showing posts with label crafting. Show all posts

Tuesday, 9 October 2018

#TeacherTuesdays World War One Trench Model

World War One Trench Model

This week's challenge was a model of a World War One trench on a limited budget! First up the lid of a copier box had part of the sides cut out, display border stapled on and the top edge folded in. I then stuck tea died bandages on the folded cardboard to act as sandbags. A few used tea bags and some polystyrene packaging for more internal sandbags:

World War One Trench Model

Mud coloured paint liberally added:

World War One Trench Model

Today we added more polystyrene sandbags, a wooden ladder to reach the trench front and some more little features:

World War One Trench Model

More photos:

Monday, 13 October 2014

No Sew Bunting

My daughter asked me on Saturday afternoon to help make her some bunting for her school residential which she needed by today! Now I currently don't have a sewing machine and I've never made bunting so I had to think laterally...

We went into one of our local discount craft supply shops and picked up some ribbon and some squares of cloth for under £5. Once we got home I got my daughter to create a cardboard template for the shape she wanted the bunting to be. We then folded the cloth around the card a few times and cut out several triangles at time.

Once we had enough triangles I dug out the badge glue from the drawer and used it to stick the ribbon across the tops of the triangles in a repeating pattern. Then I put them outside to dry in the sun:


Not too bad an effort for an non crafty mum! To recreate you will need:

  • ribbon
  • fabric to cut to shape
  • cardboard template
  • fabric/badge glue
If I can do it anyone can!

Monday, 31 March 2014

Review: Cra-Z-loom Bracelet maker

Sponsored Post

cra-z-loom bracelet maker

We were sent a Cra-Z-loom Bracelet maker for my 10 year old daughter to try out and review. The idea is pretty simple you use the loom provided to create a variety of bracelets by following the instructions!

My daughter pretty rapidly sat down and off her own bat with no help from me she produced the simplest kind of bracelet:


Then she decided to up the ante and go for a bridge style bracelet which is included in the instructions. After a while she gave up and handed me the loom, I decided to double check the instructions and did discover she hadn't quite followed them right so I reset the entire loom correctly:


Then I attempted to follow the directions but got a bit confused so resorted to YouTube - it is amazing how many tweens and teens have made instruction videos on how to do these kind of bracelets! 

I have to admit that I am still working on it as I am obviously not as nimble fingered as the kids on the videos. This is what I had managed to do before I accidentally unravelled it:


To be honest we need to dedicate more time to practising doing these together and my daughter has been far too busy to sit still long enough. It's definitely something that starts off easy and then gets harder! At an RRP of £14.99 it will keep idle hands out of mischief for quite some time..

Monday, 17 March 2014

Review: Cool Create Swap Watch

Sponsored Post

We were sent a Cool Create Swap Watch set from Flair to review:


Cool Create Swapwatch

The set includes straps, bezels, jewels and cords to make lots of customisable watches - using the one a actual watch provided. My 10 year old had lots of fun trying different ones starting with a simple combo:


Cool Create Swapwatch

Then she decided to have a go at making a couple with plaited laces:


Cool Create Swapwatch

Next up was using the jewels. She found this quite fiddly so got me to start it off:


Cool Create Swapwatch

There is a lot of potential in this kit for making watches to match so many outfits and to cover most tastes. It's all part of Flair's Cool Create range which is designed to get children away from electronic entertainment and being creative. At £14.99 you will get your money's worth in entertainment value from the set and it can be continually reused and the watches changed.

Family Fever

Thursday, 1 August 2013

Guest Post: Crafted with love

The final guest post from Squiff

I love the unique and personal feel of handmade items. I’m a keen cross-stitcher and spent my pregnancy frantically working on a bold, bright animal alphabet and matching numbers sampler that now hang above my son’s bed.


The next project I turned my hand to was a name jigsaw – I bought a chunky wooden jigsaw of my son’s name online and painted it in colours to match his room. It stands on the bookshelf and is a great tool for starting to explore phonics with him.


My latest project is a word cloud poster of his likes. I listed his favourite things now (aged two) and those when he was six months old. I then used different sizes and colours of font to make them into pictures , printed them on photo paper and popped them into coloured frames. As well as an attractive decoration for his bedroom they are a great record of his development and will give us a permanent record of those often fleeting childhood passions.


What a talented lady!

Friday, 7 September 2012

Friday Review: Craft Party - Treasure Box Party


Sponsored post

We were sent this craft party in a box to try out and review. It's a simple idea to have everything you need to entertain up to six children in a box. Seems like a great idea for a birthday party. My 8 year old was quite keen to open it up and see what was inside:


The kit has 6 boxes, brushes and paint pots plus stick on jewels. Usefully the instructions advised on how many jewels each child could use. All we needed to do was spread some newspaper and get some water to clean the brushes. Then we followed the clear instructions to start decorating our boxes:


Once we were happy with our jewels it was time to paint around them:


We were both fairly pleased with our final treasure chests:


Of course you need treasure for your chest so the kit also includes a bracelet making kit:


These were really simple to thread the beads on but the elastic thread was very hard to knot off as my knots wouldn't stay tied! My daughter seemed pleased with her final bracelet though:


The kit has an RRP of £19.99 making it a great value party entertainment. In fact we have saved 4 boxes for my daughter's birthday next month!

Monday, 13 August 2012

Monday Review: Blingles Bling Studio

Sponsored Post

My daughter was sent a Blingles Bling Studio for her to create from bling for her favourite things. It was a very neat little kit with everything going together in a special container:


The instructions were very clear as to how to set up everything to create your bling. A template is selected and put under the special rubber screen then a clever little tool is used to apply the right coloured sparkles on the template:


This required plenty of concentration but my daughter was totally absorbed:


Once the design is finished a cover is put on before it is applied to the glue paper. Once it is sticky the bling is applied to the item of choice. In this case her iPod:


At this point we were joined by our neighbour who is aged 30. She had a lovely time creating more bling with my daughter and would have been quite happy having a kit of her own!

The studio is available from retailers such as Argos for around £19.99. It would make a great birthday or Christmas present for the tween in your life. It is aimed at 6+ and my 8 year old certainly loves it.

Monday, 30 July 2012

Monday Review: Paper FX

Sponsored Post


 We were sent this new crafting set for ages 7 and up. It comes with everything you need (except scissors to trim the final product):


The premis is that you:
  1. Tear it
  2. Crease it
  3. Weave it
  4. Make it
At first my daughter did't get out the comprehensive instructions and we struggled following the very simple ones on the box! Then I discovered the proper instructions and things moved on a lot.

Tear It

The paper tearing device as a wide and narrow setting. We learned that you have to have a very firm pressure along the tearing edge to make it neat:


Crease it

The next gadget puts parallel creases into the paper to enable folding. Again a steady hand was needed to get them straight:


The instructions for each project tell you how many strips you need and whether they are open or closed. The closed ones need to be glued shut:


Weave it

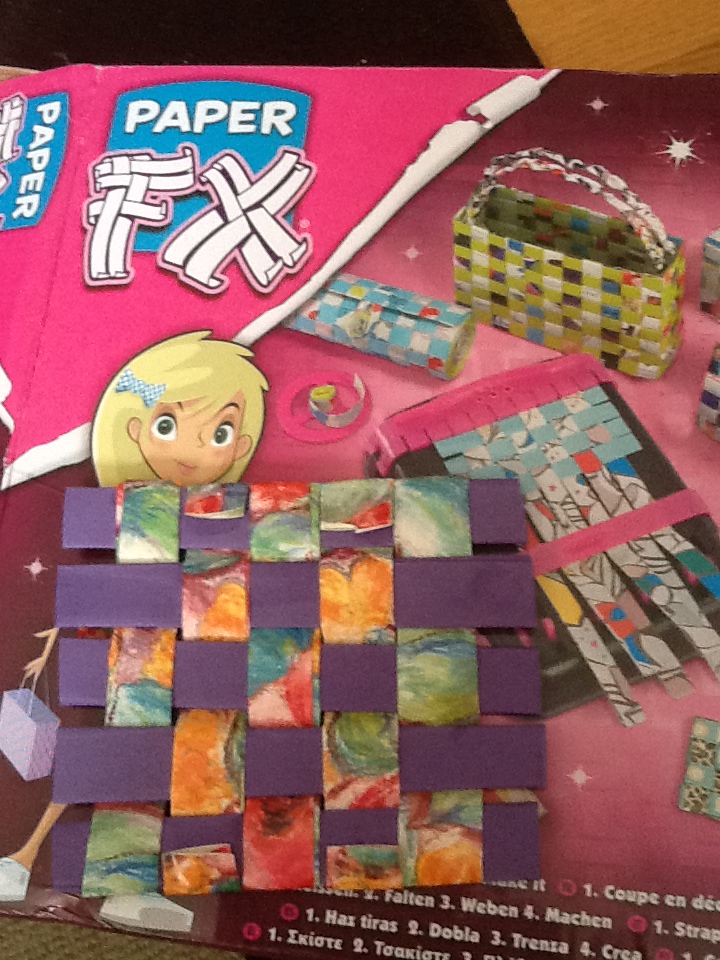
Once you have the right number of strips its time to move on to the weaving machine:


The machine makes weaving the strips very simple as the turning wheel alternates which strips are up and which are down.


Create it

As this was our first project we stuck with something simple and went for a coaster:


OK so it wouldn't win any prizes and doesn't look quite as good as the ones on the box but we did it! This is definitely a product that needs practice at to do well. 

It would make a fun thing to have at sleep over to keep a group of young ladies out of mischief. At 8 my daughter was definitely on the younger side of the crafting side but I can imagine that she will get better at using is as she gets older. I quite enjoyed the girlie time we had together making it and wouldn't mind doing more with her.

We used left over bits of wrapping paper and surplus crafting paper so that we weren't wasting things. You could even use old newspapers or magazines to make a funky bag. It has an RRP of £19.99 and should provide hours of entertainment on wet days (perfect for a British summer then!).

Thursday, 29 March 2012

Thursday Review: My Clippy Bags of Style

Sponsored Post


We were sent a My Clippy set for my 8 year old daughter to test out and review. In the end it turned into a 3 generation girlie session as my mum and I joined in the fun!


The set comes with everything except glue and scissors to make customised panels for the handbag. The instructions are very simple (although of course my daughter rushed ahead without looking!). I dug out my scrapbooking tape as this turned out to be the best adhesive to use.


You simply select backgrounds to fit on the card, cut to shape, clip with the embossing tool if required and then stick together. As my daughter got going she got more and more creative and inventive with her choices and combinations. Granny and I got to make some suggestions of our own too.